Railings - Instance Modification
The previous post was intended to familiarize you modifying railings and handrail types at the Type level. In this post, we will go through how to modify railing components at the instance level.
- Hover over the railing of which you wish to make instanced based edits. For this example, we will look at duplicating a support bracket on a wall mounted handrail. Refer to Fig-1 for an elevation view of a wall mounted handrail with standard spacing as driven by our Handrail Type, prior to instance based editing.
 |
| Fig-1: Elevation View Type Driven Support Spacing |
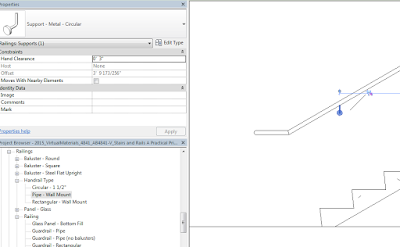
- While hovering over the Railing Type, hit Tab to cycle through your selection options until you can select only the support bracket closest to the bottom of the stair run. The support bracket will be selected and a pin icon will appear (Fig-2). This is telling us that the position of this support bracket is driven by the Type Properties of the Handrail Type. Also note that the properties of the support bracket, including the preview image, are grayed out (Fig-3).
 |
| Fig-2: Support Bracket Selected |
 |
| Fig-3: Support Bracket Pinned |
- If we wish to move the bracket or modify the support depth, click on the pin to allow instance based editing. This will change the pin graphics to open as well as remove the grayed out tone from the Properties dialog box.
 |
| Fig-4: Support Bracket Unpinned |
- Once the support is unpinned, you are now able to edit the individual support on an instance basis. Changes made to this support, be-it location, hand clearance, etc. will only apply to this one support bracket. Brackets can be moved by entering a horizontal distance and the support will automatically move to remain attached to the rail. If you move a support by mistake, clicking the pin will return the object to its original Type driven location.
- If you wish to copy a support, you do not need to unpin the original object. Simply use your copy command and add a bracket at the desired location. The newly copied support will be automatically unpinned because it not driven by the Type Properties of the Handrail Type (Fig-5).
 |
| Fig-5: Copied Support vs Type Driven Support |
- It is important to note that only Continuous Rails, top rails as defined by a Top Rail Type and handrails as defined by a Handrail Type, and their sub-elements, supports and terminations, can edited on an instance level. Non-Continuous rails do not offer this ability.
- To edit that handrail itself, hover over the Railing Type and hit "Tab" until the handrail only is selected. Once selected, the new panel will appear in the Ribbon, labeled "Continuous Rail" (Fig-6). By clicking on the Edit Rail button, we will be able to edit the handrail at the instance level.
 |
| Fig-7: Continuous Rail Panel |
- Within the edit rail command, we are able to edit the profile as well as the path of the railing, by clicking on the Edit Path button (Fig-8).
 |
| Fig-8: Edit Path |
- In addition to being able to edit the path of the rail from this dialog box, we also are given the option of editing the rail joins. Once clicked, we will snap only to intersections of rail segments. Once selected, the adjacent combo box will become activated and we can modify the join from by type to either Miter or Fillet. If we chose fillet, we must specify a radius for the join. A miter and fillet join are indicated below in Fig-9.1 and 9.2.
 |
| Fig-9.1: Mitered Rail Joint |
 |
| Fig-9.2: Fillet Rail Joint |
- Once you are happy with your edits, click the green check mark twice to complete your edits.
- Feel free to experiment with your railing edits on an instance level. You always have the ability to go back to the Type driven properties by selecting the Railing Type and hitting the Reset Railing button (Fig-10).
 |
| Fig-10: Reset Railing |

No comments:
Post a Comment