Creating Railings
The previous post was intended to familiarize you with the structure of the railing tool. In this post, we will go through how to modify existing railings to create new railings specific for your projects.
Please note that Amenta|Emma Standard guardrail/railing designs are pre-loaded into the large template file. These standard model elements correspond with our standard railing details and should be used for egress stairs.
Decorative stairs will often necessitate the need for custom stairs and railings. The following is an overview of how to modify rail structures and other components. For complicated decorative stairs, please consult your project BIM Coordinator and/or the BIM Manager for assistance/recommendations.
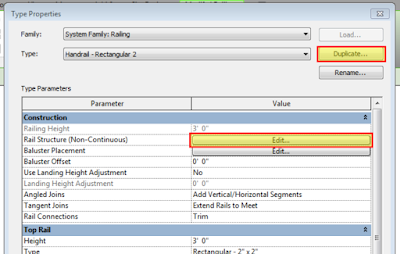
- Select the railing you wish to duplicate and click the Edit Type (Fig-1) and select Duplicate (Fig-2). This will prompt a Name box - enter the name for your new railing and hit ok.
 |
| Fig-1: Select Edit Type |
- Click on the Edit button next to the Rail Structure (Non-Continuous) to edit horizontal railing members, other than the handrail and top rail components (Fig-2). These will be edited using the Top Rail and Handrail Types.
 |
| Fig-2: Duplicating Railings and Editing Non-Continuous Rail Structure |
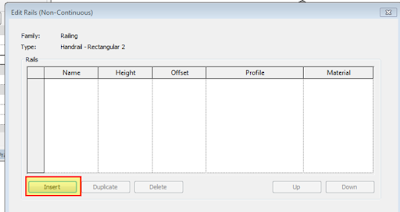
- Once inside the Edit Rails (Non-Continuous), insert horizontal railings as per your design intent, using the Insert Button (Fig-3).
 |
| Fig-3: Insert Non-Continuous Horizontal Rails |
- Once inserted the rail must be named, given a height and offset and a profile. The material can be added at this point or later. Profiles for the railing must be selected from a pull-down list of profiles loaded into the project, so any custom rails must be created before they will become available for selection (Fig-4).
 |
| Fig-4: Completed Non-Continuous Rail |
- Once you have created your first rail, you can duplicate the rail, and change the properties as necessary for your rail design. After all non-continuous rails have been completed, use the OK button to save your updates and exit out of the Edit Rails dialog box.
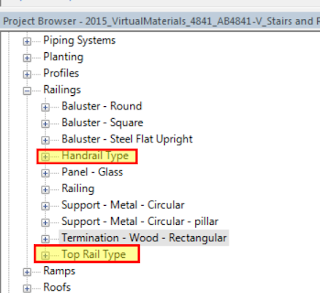
Next, we will take a look at using the Continuous Rails, whether it be the Top Rail, Handrail 1 or Handrail 2. Each of these continuous rails are driven by Handrail and Top Rail Types. These can be found within the family browser under the Railing Heading (Fig-5).
 |
| Fig-5: Handrail and Top Rail Types in Family Browser |
- When expanded, all handrail/top rail types currently in the project will be visible. These handrail/top rails are then able to be loaded into the Railing System Family. To edit a handrail/top rail type, double-click on the type you wish to edit and the corresponding type properties dialog box will appear (Fig-6).
 |
| Fig-6: Handrail Type Type Properties Dialog |
- Edits done within this dialog box will change all locations in which this handrail type is assigned (unless they have been edited on a instance base) - handrail types can be assigned to multiple railing types. Individual handrail types can also be editing on an instance level once they are loaded into a railing type by "tabbing" the railing type until the handrail type is selected.
- One item to note is that there is a bug in Revit related to the Support Family. if you change the support type and hit ok, nothing will happen to the model elements. To make the changes execute, you must make a change to the position of the handrail type within the railing type it is loaded into. This will update the support family, but likely put the support on the wrong side of the railing. Change the side back after the model support has been updated.
- Once you have finished editing your handrail types, it is time to assign them to your railing type. This is achieved through the Type Properties of the Railing System Family.
- Select the model representing the railing you wish to modify and hit edit type. This will bring us back to the Type Properties of the Railing System.
- Find the continuous rail you wish to assign, Top Rail for a top or guardrail and either Handrail 1 or Handrail 2 for a handrail element.
- Once you have found the correct rail, use the pull-down under type to select your crated handrail type. Once changed, the lateral offset and height will be filled in, but grayed out. These are grayed out because their values are driven by the type properties of the handrail type. A position option becomes available to select where the handrail type will be placed relative to the Railing Type host, see Fig-7.
 |
| Fig-7: Assigning Handrail Type to Railing Type |
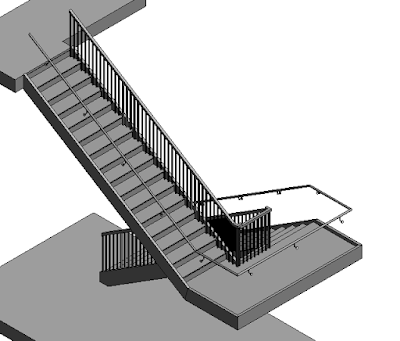
- Once you have assigned your handrail type, click OK and all Railing Types will be updated with your new handrail type. See Fig-8.
 |
| Fig-8: Updated Railing with Handrail Type |
As mentioned above, handrail types as well as supports, can be edited on an instance basis, and allow fine-tuning of specific conditions.


No comments:
Post a Comment