Finish Plans with Dynamo
One of the most time consuming pieces of defining the finishes within our Construction Documents is filling in the finish tag for each room. Under the current method, you must either edit the tag on a room by room basis, update in the room properties or update in a room schedule. While each of these are valid methods, they are time consuming based on the functionality of Revit.
Using a custom Dynamo script, we can now fill out our finish tags in plan via Excel. The following is the process (assuming you already have installed Dynamo).
Once the data is pushed back into Revit, you have the option of either editing within Revit individually, or re-running the Dynamo script and editing in Excel. Hopefully this will help speed up the process of entering finishes into our Documents.
 |
| Fig-1: A|E Standard Finish Tag (note the new order of finishes to follow a top to bottom progression) |
- Open your Finish Floor Plan and place your room tags in each of your rooms. This task is still time consuming in Revit 2015. (Sneak preview, this will be enhanced in the new 2016 version.
 |
| Fig-2: Sample Floor Plan with Finish Tags Added |
- Now that your finish tags are placed, we can launch Dynamo via the add-in tab in Revit. (Note: Finishes can be entered prior to placing the finish tags if desired).
 |
| Fig-3: Dynamo Add-In |
- Once clicked on, Dynamo will launch in a new window and you will be brought to the Dynamo splash screen. From here, we will be able to use the Open command to load our custom script.
 |
| Fig-4: Dynamo Splash Screen |
- Click on the open command and browse to our library and the Dynamo folder. The script we are utilizing today is named "Room Data Exporter.dyn". This will open the script for us to use.
 |
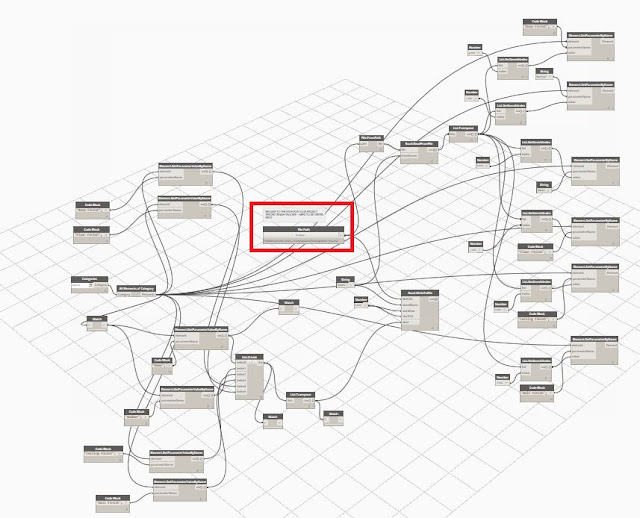
| Fig-5: Full View of Dynamo Script |
- Once you have opened the script, focus your attention on the Browse node near the center of the screen (see red image above). This is the only modification that a user needs to complete to use this script. This Browse node needs to point to the location of your excel file. Note: You will need to create a blank Excel file within your project folder structure. Once you select your file, the file path will be inserted below the Browse button (see Fig-6 below).
 |
| Fig-6: Enlarged View of Browse Node |
- Once you have pointed the script to your excel file, Click the Run button in the lower left hand corner.
 |
| Fig-7: Run Button to activate the script |
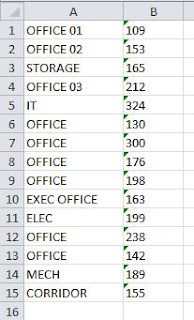
- After pressing the Run button, Excel will open and extract the Room Names and Room Numbers from your Revit File (see Fig-8). Note: After pressing run, you will see yellow text appear to the right of the Run button indicating "Run completed with warnings". This is normal and will appear until all of the finishes have been filled out for ALL of your rooms, not just the rooms on your sheet. This will also serve as a good way to check if you have rooms in your model that are not placed and possibly left over from earlier phases, designs, etc.
 |
| Fig-8: Excel Initial Creation |
- Once the initial excel file has been generated, you now will start to input the desired finishes into the excel file, so that they can be pushed back into Revit. Your data will be input into columns C, D, E and F. The order of the finishes follows the finish tag. Column C = Ceiling Finish, Column D = Wall Finish, Column E = Base Finish, Column F = Floor Finish. Once you have entered your finishes into Excel, save your Excel file.
 |
| Fig-9: Completed Excel File |
- After saving, go back into Dynamo and click Run again and the finishes will populate into your Revit finish plans.
 |
| Fig-10: Complete Finish Tags via Dynamo |
 |
| Fig-11: Completed Exec Office Tag in Revit |
 |
| Fig-12: Corresponding Finish Information in Excel |

